Win11 installation

Took me some time (weeks, months ?) to figure out how to install Win11 on my ASRock A520M-HVS motherboard. Not so easz, maybe because I have become afraid of the requirements. I have two very old displays (DELL and LG ) but they fit nicely on my desk. I like it to be able to work with two displays.

Even copilot pessimist about using so old displays, or should I say graphics card (NVS300). Well Gemini gave me hope telling that A520M-HVS motherboard can manage two displays. And thats true. I got rid of my NVS300 and connected the two displays dot the HDMI and VGA port.

Getting the motherboard configured for Secure boot was quite tough. You cannot do it in “one stroke”. Each time You change the motherboard configuration setting You have to save the new settings and make a reboot.

SATA connectivity also played some tricks. Windows11 would not install being connected to SATA2. It must be the SATA1 connector on the motherboard.

That s all.

Troubles with PS2

My new motherboard has a PS2 connector and I still have a PS2 Logitech keyboard working fine, so why not using it. Quite worried because sometimes it stopped working. Did not understand what s the matter. Plugging in and off, sometimes it did help, sometimes not.

I have some spare PS2 keyboards, so I wanted to find out if there s something odd with this keyboard.

Then I did rmember that some time ago I did have some issues with the PS2 extension cable. And in fact, the reason for this miship, a pin inside the connector has not been straight any more. Put it up straight could fix this issue

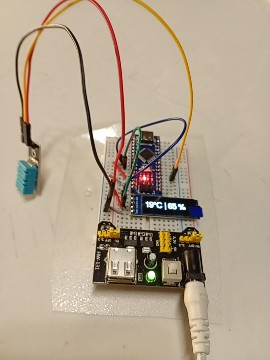
0.91″ OLED I2C Display

If You have a small Arduino project, You do not always want to connect the device to the serial monitor.

There are the rather bulky LCD displays, concerning the model 2004 16 x 4 it is rather expensive.

So why not try it with an OLED display? There are two formats of OLED displays and I have tested them both.

The first one has 32 lines, the other twice as much.

I would say, You can have one line with rather big sized characters if You use the 128×32 OLED.

So You are better off with the 128×64 OLED because with smaller characters You can display up to four rows and You do not need the serial monitor.

Lidl Silvercrest WiFi SWV 733 A2 repeater

You want to connect a PC, Laptop, SmartTV whatever to the network. You do not want or You cannot use Ethernet cable connectivity. So You think You can choose this option and use the Lidl Silvercrest repeater.

What is the setup ? You have to configure it in client mode. When asking about an IP adress (LAN interface setup), it does not matter. This is just for to be able to access the repeater. For DHCP, configure it with “Server”.

You have to configure the wireless connectivity with Your credentials for to connect it to the router. of course. The Wireless Info box should show the status “connected”.

Chromebook : Camera not working

You might get crazy when You rush into a videoconference and the inbuilt camera does not seem to work.

You check the camera settings. Everything is fine. No way. Finally found out that there is a plastic ruler, a little plastic part that closes the lens. You have to move this ruler at the top of the laptop monitor.

Plastic ruler on the top of the display

Arduino SD card access

I have an Arduino Ethernet Shield W5500 Development Board which has a slot for a SD card. I insert a Micro SD card into the slot (FAT32 formatted) and try executing a sketch because Arduino should execute the HTML file on the webserver …

// initialize SD card
Serial.println("Initializing SD card...");
if (!SD.begin(4)) {
    Serial.println("ERROR - SD card initialization failed!");
    return;    // init failed
}
Serial.println("SUCCESS - SD card initialized.");
// check for index.htm file
if (!SD.exists("index.htm")) {
    Serial.println("ERROR - Can't find index.htm file!");
    return;  // can't find index file

The “index.htm” file is there. So I am quite astonished that the serial monitor complains about a missing file.

I have a SD card module at hand and execute a sketch writing some lines in a testfile …

Serial.print("Writing to test.txt…");
myFile.println("This is a test file :)");
myFile.println("testing 1, 2, 3.");
for (int i = 0; i < 20; i++) {
myFile.println(i);
}
// close the file:
myFile.close();
Serial.println("done.");

Now I can see in the serial monitor that there is NO error message that the “index.htm” file is not there. And I am quite surprised that the C++ sketch has written the text into the “index.htm” file and saved it as “INDEX.HTM”.

Seems to be a matter of fact that Arduino, when accessing a Micro SD card (FAT32) , expects the filename in upper cases and ignores filenames with lower case letters.

Arduino Nano : Cannot upload code

Quite common that could not upload code to my Arduino Nano. Uno, Mega no problem. So could not be an issue with the USB ports. Tried out different Arduino IDE versions. Different operating systems/versions. Still not possible to upload code. Finally found out that the reason was that upload requires the old bootloader. Most of the Arduino Nano s (at least the ones that I own) do not use the standard bootloader. I saw old bootloaders are required for …

WCHCH340G AMS1117 5.0 H947MK
Diymore/WCH
CH3400 AMS1117 ATMEL M328 P

HDD enclosures Wavlink ./. Orico. HDD 2,5 ” Recycling

I did already buy some Orico products and have been quite happy with them.

For some reason, when I needed a HDD enclosure for my old HDD (taken out of my broken Lenovo Ideapad S10) I bought a Wavlink enclosure. Maybe because Wavlink was promising that it were working with all SATA types … SATA I/II/III. Orico publishes less information.

Reason for doing this is that I like to reuse the harddisks. Already did have some problems accessing the MicroSD card on my Raspberry and now trying to save data on an external HDD.

I do have a HDD SATA adapter as well, but an enclosure is more beautiful than leaving the HDD with an adapter on the office desk .

However, when the Wavlink enclosure has been shipped, I saw that there was no access to the data. So this enclosure was quite useless.

The solution to this problem was ordering an Orico encloser, which, in fact was working.

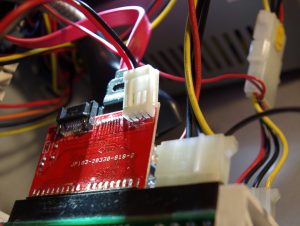
Zweiweg Festplatten Adapter IDE <-> SATA – So funktioniert er

Da dem bei Ebay gekauften Adapter keinerlei Bedienungsanleitung beilag, habe ich ihn getestet und mit dieser Konfiguration wurde die IDE Festplatte an einem SATA Anschluss erkannt.  Das SATA Kabel ist bei einer IDE Festplatte links Seitens der Stromkabel angebracht.